Showing posts with label recipe. Show all posts

Wednesday, March 12, 2014

Ravioli Lasagna Crock Pot Recipe

I'll admit right off the bat, you're gonna have to take my word for this because I forgot to take a photo. LOL! Last night I made dinner. Ha! No, I tried a new crock pot recipe I found on Pintrest.

For Lent we gave up meat, so I've been seeking out non-meat recipes to liven up our dinners. We do the typical fish and veggie burgers, but I wanted a few new things so make life interesting. So, I put vegetarian in the search bar and came up with a bunch of recipes.

When I found this recipe under crock pot recipes I decided we had to try it. The original calls for ground meat, but other than that I thought it would adapt well to skipping that step.

I put all the ingredients together around 2:00 p.m. with the idea that it would be ready when we came home from the gym at 8:00 p.m. It was perfect timing really.

When we came home from the gym, it was ready. We spooned out a serving each and dug in. It was delicious! I did nothing, but what the recipe said. I didn't add seasoning or any additional ingredients because I wanted to make sure the core recipe tasted good. And did it!

We decided though, it would be good with meat though we can't try that thought out until after Easter. We also thought we could add in some vegetables - tomatoes, broccoli, carrots, peppers, onions - would add to the flavor while giving us some added nutrients.

This will be a recipe we make again! We got 3.5 servings from the recipe, so we get to have this two more times! Actually pretty excited about this.

Ravioli Lasagna Crock Pot Recipe

1 pound ground beef or turkey
1 jar pasta sauce
25-30 frozen ravioli
2 cups Italian blend cheese
1/4 cup water

Layer ingredients in crock pot: sauce, ravioli, sauce, ravioli. Sprinkle cheese evenly all over top. Put water into empty pasta sauce jar and shake. Pour this water evenly over top of lasagna. Cover and cook on low 6-7 hours or high about 4.

Recipe credit to Jamie's Cooking.

Friday, November 4, 2011

Roasted Chick Peas

This week I decided to try making roasted chick peas.  I'd never really liked beans all that much growing up honestly, but lately they have tasted pretty good in stuff and I recognize that I am really bad at getting protein in my diet.  Roasted chick peas sounded like a great way to get some protein in and have a tasty snack.

I started out with one can of chick peas:

I then gathered my spices:

I'll be honest here, I'm not one for measuring unless I'm following a recipe.  I was kinda flying by the seat of my pants and just dumped seasonings in:

I put them in a roasting pan and cooked them for 20 minutes at 425*:

I am storing mine in a tupperware container.  I would recommend letting them cool before putting the lid on.  We found out that if you put the lid on while still warm the heat will undo the crispiness of the beans.

They are very tasty and in the scheme of things, the only calories in this recipe comes from the chick peas themselves.  Not bad for a tasty snack!  I personally use the serving size on the side of the chick peas can as my guide, so for me 1/2 cup is a serving.

Hope you enjoy them!  I think next time we make them we may try different seasonings.  :-)

Wednesday, November 2, 2011

Applesauce

Who doesn't love applesauce?  It's always been a favorite of mine.  When I was a kid applesauce was a great snack and my mom always mixed in some cinnamon.  Yum!

As an adult, I still love applesauce.  I actually found a quick and easy applesauce crock pot recipe that tastes just like apple pie filling.  Nom nom nom!  Thought I would share the recipe with you.  It's just perfect on it's own or over ice cream.

First take 8 apples (I bought a bag with 9 and just went with it).


Core

Peel

Chop into small pieces

Add 1/2 cup water, 1/2 cup sugar (I used Splenda), and cinnamon to taste.


Cook on high for 3.5-4 hours or on low for 8-10 hours.

Enjoy!

This is one of my favorite fall recipes and while it takes a bit to get it in the crock pot (what with all that chopping and all), it is totally worth it!

Sunday, December 5, 2010

Hungry Girl Super-Cheesy Crazy-EZ Sheppard's Pie

So, I have TONS of cookbooks.  Lots of recipes.  One would think I would never, ever have to wonder "what's for dinner?"  Yea, whatever.  I ALWAYS wonder what to have for dinner.  Sucks really. 

So, I'm trying to get this whole eating thing under control and found a recipe for Hungry Girl's Super-Cheesy Crazy-EZ Sheppard's Pie.  Hubby and I love Sheppard's Pie and when I saw how EASY it really is, I figured we should try it.  So, we stayed in Saturday night and made dinner.  Normally, I like to eat out, but it sure is easier eating healthy when staying in than going out.  At least for me.

While I was making dinner last night, I took photos of the process and thought I would share with you.  We have already decided we WILL be making this again.  It was delicious!

Ingredients
1 (24 oz) bag (about 6 cups) frozen Green Giant Family Size Broccoli, Carrot, and Cauliflower in Cheese Sauce
1 pouch Betty Crocker Cheddar and Sour Cream Mashed Potatoes
2 cups frozen ground beef-style soy crumbles

Directions

Preheat oven to 400 degrees.

Place contents of veggies and sauce bag in a large microwave-safe bowl.  Cover and microwave for 8-10 minutes until mostly thawed.

Meanwhile, in a medium-sized bowl, combine contents of potato pouch with 2 cups hot water and stir until thickened.  Set aside.

Spray an 8"x8" baking pan with non-stick cooking spray.

Add soy crumbles to the pan and evenly distribute along the bottom.

Evenly spoon saucy vegetables over crumbles.

Evenly top with potato mixture, using a spatula or spoon to smooth out the surface.

Once all ingredients are added, put in oven uncovered for 20 minutes.


Doesn't this look delicious?  We have two meals left from this recipe.  Oh so good!


Nutritional Information
139 Calories
2.5g Fat
10g Protein
22g Carbs
5.5 Fiber

Wednesday, June 16, 2010

Eggplant Parmesan

While on vacation in Italy, I had THE BEST eggplant parmesan ever.  Seriously.  It actually was the best meal I had the entire trip.  I do not lie.  When we came back to the States, I kinda wanted more.  So, I looked up eggplant parmesan recipes to try and found an easy one at allrecipes.com.  And honestly, it was a tad time consuming, but it was very easy and the results?  Well worth it!  My hubby even said it's the best thing I've ever made.  Which is sad when you think we've been married 8.5 years...  Anyway, here's the recipe.  Thought I would share since it turned out so well!


Eggplant Parmesan
 Bottom of Form
Ingredients
  • 1 medium eggplant sliced
  • 1 egg beaten with 2 tablespoons milk (ummm...I kinda forgot the milk.  It works fine with just the egg.)
  • Dried Italian bread crumbs
  • Olive oil
  • 6 ounces tomato paste
  • 6 ounces white or red wine
  • Pinch dried oregano
  • Salt and pepper, to taste
  • 1 clove of garlic, crushed
  • 1/2 pound mozzarella, sliced (I used shredded)
  • 1 cup freshly grated Parmesan cheese
Directions
Preheat oven to 400 degrees F. Slice washed eggplant 1/2-inch thick. Dip slices into the egg mixture and then into the bread crumbs, coat well. Grease a cookie sheet with olive oil. Arrange each slice of coated eggplant in one layer on the cookie sheet and drizzle each piece with olive oil. Bake in the oven for about 15 minutes. Check that the slices are golden brown, turn then and bake for another 15 minutes. They should be browned on both sides. Set aside.
In a small saucepan dilute the tomato paste with wine. A good mix is a can of paste and a can of wine. Add the oregano, salt, pepper, and crushed garlic. In a baking dish arrange browned eggplant slices in 1 layer. Spread 2 tablespoons of sauce on each slice. Layer each eggplant with a slice of mozzarella and sauce until all is used. Top with Parmesan cheese and bake for about 20 minutes. Serve hot.

Monday, December 7, 2009

0 Point Holiday Appetizers

WW just posted this great article with recipes for 0 point appetizers for the holidays. Thought I would share with you, in case you are hosting or need to bring a dish. :-) The frittata and cucumber ones look good to me!

0 Point Holiday Appetizers

Friday, November 20, 2009

Typical lunch

So, I post a good deal about what I eat in the Points section of my updates. One lunch we have quite frequently is a Flat Out Veggie wrap. So, I thought I would share with you what I do to make it, in case it sounds like something you would like. If not, skip this post and keep going. :-)

Lunch generally helps me get my veggies in, if I make it myself. So, once or twice a week I will grab the skillet, cut up veggies and make a toasted veggie wrap using Flat Out Bread. Here's how you make it.

I take one Flat Out Bread wrap:

Then I spread Sonoma Jack Lite Cheese onto it. There are three flavors our grocery store carries and we like all three - Pepper Jack, Garlic and Herb, and Peppercorn.
With the cheese spread on the Flat Out Bread.
Once that's done, I take cut up veggies and stir-fry them in the skillet. We generally go with onions, carrots, red and green peppers, and whatever else we might have in the fridge. It's all personal preference, so put whatever vegetables you like in the stir-fry. I also like to add a little seasoning to the vegetables. Most of the time it's garlic powder, but sometimes it's Old Bay, sometimes it's Cajun. Depends on what I'm in the mood for.
Once the veggies are cooked to my liking, I put them in the middle of the Flat Out bread.
Then take the sides and wrap them around the middle. With the cheese spread across the whole bread, it makes a kind of glue that holds the edges together when you make the wrap. I've done this without taking the cheese to the edge, and when you fold the edges in, they don't stay. The cheese on the outside edges really makes the difference.
Now it's ready for the toaster oven. Put the setting what ever works for yours, ours is set to toast. It's such an old toaster oven that we basically leave it on the same setting for everything. LOL!
When it comes out, it's nice and toasted and yummy! It's a nice healthy 2 point sandwich that will really fill you up! I've also made it with canned tuna in water, which ups the point value to 4, but gives you the benefit of protein. Enjoy!

Sunday, May 31, 2009

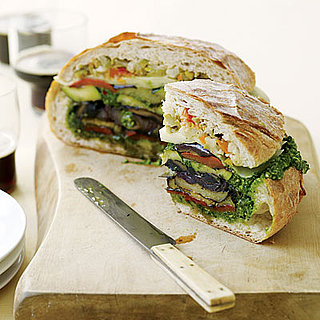
I Wish I Could Make This


Grilled Vegetable Muffuletta

Ingredients

1 eggplant, sliced 1/2 inch thick
1 zucchini, sliced 1/2 inch thick on an angle
1 red bell pepper, quartered lengthwise
1 large portobello mushroom cap
1 red onion, sliced 3/4 inch thick
6 ounces baby spinach
1/3 cup pine nuts (a generous handful)
2/3 cup grated parmigiano-reggiano cheese (a couple generous handfuls)
1 cup store-bought giardiniera (pickled vegetable salad)
1/2 cup pitted green olives
One 8- to 9-inch round loaf crusty bread
1/4 pound deli-sliced provolone cheese
1/2 cup extra-virgin olive oil
Salt and pepper

Directions

  1. Preheat a grill or grill pan to medium-high. Lightly brush the eggplant, zucchini, bell pepper, portobello and red onion with 1/4 cup olive oil; season with salt and pepper. Cover and grill, turning once, until charred, about 6 minutes.
  2. Using a food processor, puree the spinach, pine nuts and parmigiano-reggiano; season with salt and pepper. With the machine on, drizzle in the remaining 1/4 cup olive oil. Transfer the pesto to a bowl; rinse the food processor.
  3. Using the food processor, pulse the giardiniera and olives into a coarse relish.
  4. Slice the top quarter off the bread and scoop out the insides. Spread half the pesto on the inside of the bread, layer with half of the grilled vegetables, then spoon the remaining pesto on top. Fill the bread with the remaining vegetables and top with the provolone. Spread the inside of the bread top with the vegetable relish and set into place. Press down firmly, then cut into wedges.

Serves 4.

Anyone else surprised this recipe doesn't have nutritional information? LOL! Oh, how I long for this...